Remote deployment with CLIO
This tutorial deploys CLIO to a remote computer over SSH from the CLIO desktop app.
-
Step 1: Open the deploy dialog
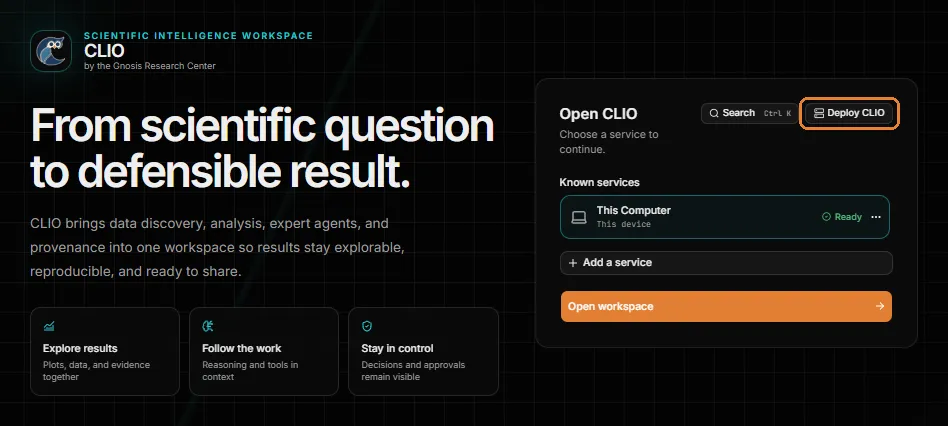
Section titled “Step 1: Open the deploy dialog”Open CLIO. On the start screen, choose Deploy CLIO in the Open CLIO card.
-
Step 2: Choose a remote host
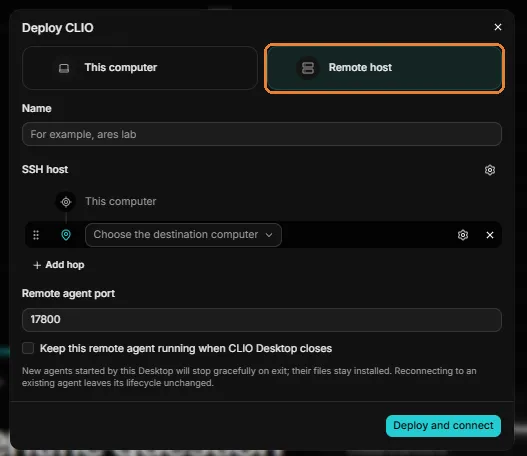
Section titled “Step 2: Choose a remote host”In the Deploy CLIO dialog, choose Remote host.
-
Step 3: Name the deployment
Section titled “Step 3: Name the deployment”In Name, enter a name you will recognize, for example
Notchpeak1 Login.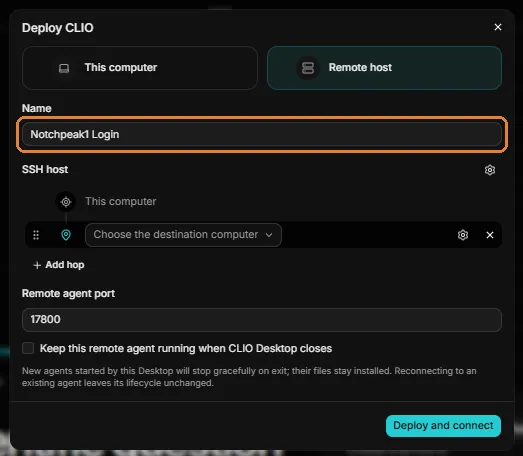
-
Step 4: Choose how to reach the remote computer
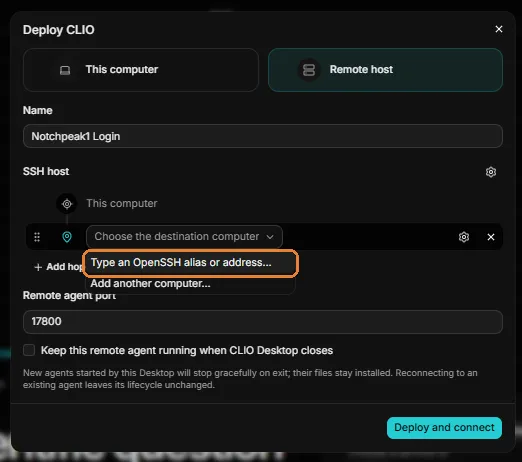
Section titled “Step 4: Choose how to reach the remote computer”Under SSH host, open Choose the destination computer. It offers two options:
- Type an OpenSSH alias or address… connects with a host alias from your SSH configuration or an address you type.
- Add another computer… saves a new computer to connect to.
This tutorial uses Type an OpenSSH alias or address….
-
Step 5: Enter the remote address
Section titled “Step 5: Enter the remote address”Type your username and the remote computer’s address as
username@hostname, for exampleusername@notchpeak1.chpc.utah.edu. Choose the checkmark to confirm it.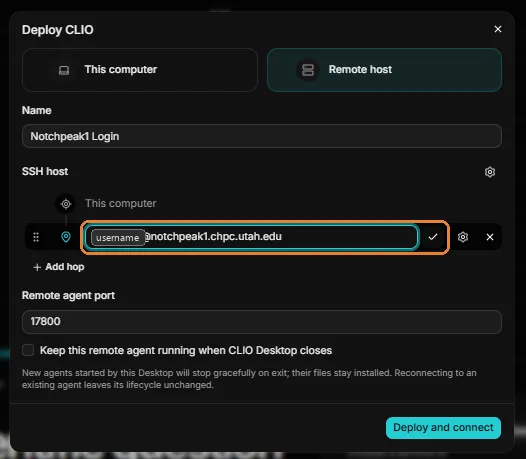
-
Step 6: Configure the host
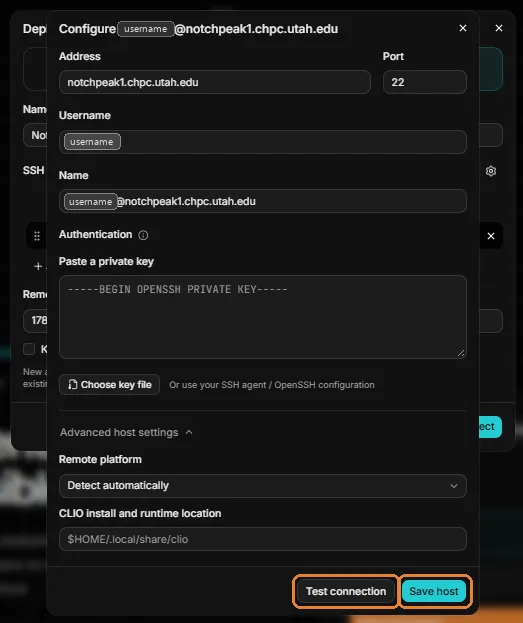
Section titled “Step 6: Configure the host”A Configure window opens with the Address, Port, Username, and Name filled in from what you typed. Check that the Address, Port, and Username are correct. Name is a label for this host, and you can change it to any name you like.
Under Authentication, choose how CLIO signs in to the remote computer. You can paste a private key, choose a key file with Choose key file, or leave the key empty to use your SSH agent or OpenSSH configuration. This tutorial leaves the key empty and relies on SSH.
Advanced host settings lets you set the Remote platform and the CLIO install and runtime location. For a login node, keep the defaults: Detect automatically and
$HOME/.local/share/clio.Choose Test connection to check that CLIO can reach the remote computer, then choose Save host.
-
Step 7: Add a hop to the compute node
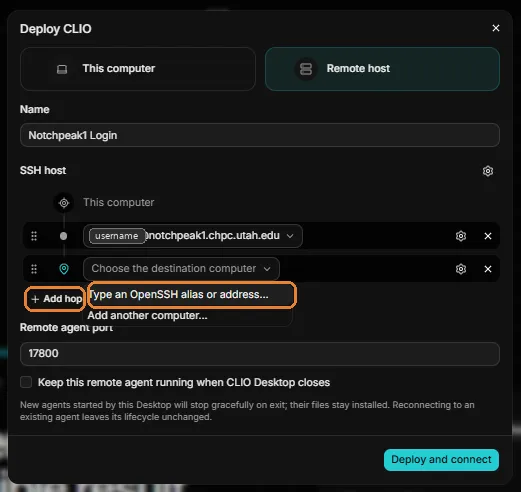
Section titled “Step 7: Add a hop to the compute node”To run CLIO on a compute node, connect through the login node you just saved. Choose Add hop. The login node moves up to become the first hop, and a new Choose the destination computer row appears below it for the compute node.
Open Choose the destination computer and choose Type an OpenSSH alias or address….
-
Step 8: Configure the compute node
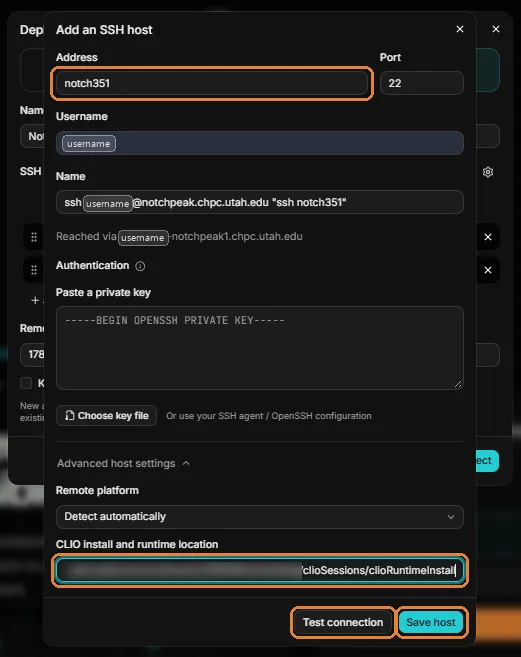
Section titled “Step 8: Configure the compute node”Enter the compute node in the new row, then choose the settings gear on that row to open Add an SSH host.
In Address, enter the compute node’s hostname, for example
notch351. The Reached via line below Name shows that CLIO connects to it through the login node.In Name, enter any name you like. This tutorial uses
ssh username@notchpeak.chpc.utah.edu "ssh notch351", which describes the SSH command the hop effectively runs: connect to the login node, then from there to the compute node. A simpler name, such asnotch351, works just as well.Set Authentication the same way you did for the login node.
Under Advanced host settings, you can set a specific directory for the CLIO install in CLIO install and runtime location.
Choose Test connection to check that CLIO can reach the compute node, then choose Save host.
-
Step 9: Choose a port
Section titled “Step 9: Choose a port”Back in Deploy CLIO, the SSH host route now runs from this computer through the login node to the compute node.
In Remote agent port, enter the port the CLIO agent listens on. The default is
17800, and you can choose any free port. This tutorial uses17855.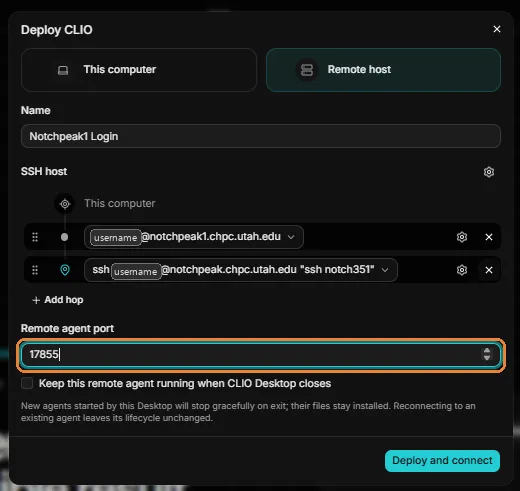
-
Step 10: Choose whether the agent keeps running, then deploy
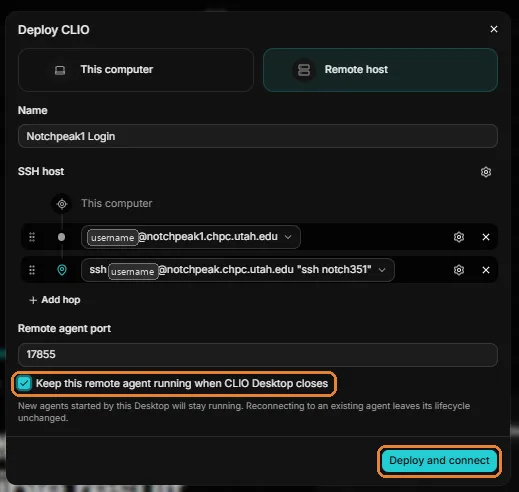
Section titled “Step 10: Choose whether the agent keeps running, then deploy”Keep this remote agent running when CLIO Desktop closes controls what happens to the agent when you close the desktop app:
- Unchecked, an agent started by the desktop app stops when you close the app. Its files stay installed on the remote computer.
- Checked, the agent keeps running after you close the app.
Reconnecting to an agent that is already running does not change how it stops.
Choose Deploy and connect.
-
Step 11: Sign in and follow the deployment
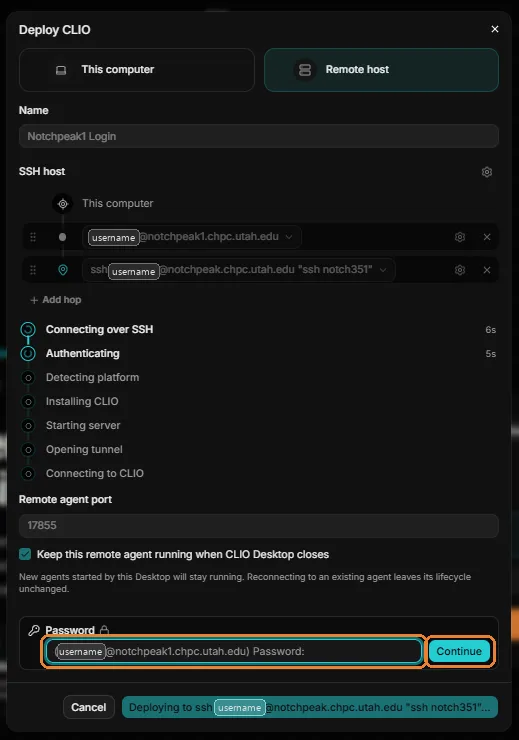
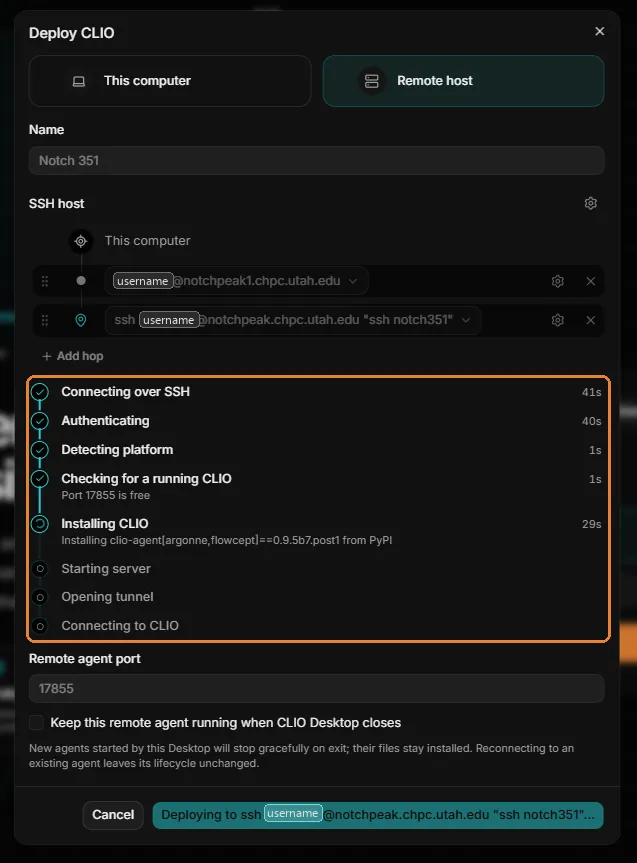
Section titled “Step 11: Sign in and follow the deployment”CLIO shows each stage of the deployment as it runs, with the time each one takes:
- Connecting over SSH
- Authenticating
- Detecting platform
- Checking for a running CLIO
- Installing CLIO
- Starting server
- Opening tunnel
- Connecting to CLIO
If the remote computer asks for a password, a Password box appears. Enter your password and choose Continue. What you are asked for depends on your HPC center’s policies. Some centers also ask for a second factor, and you may not see a prompt at all if you sign in with SSH keys.
-
Step 12: Wait for the deployment to finish
Section titled “Step 12: Wait for the deployment to finish”CLIO marks each stage with a checkmark when it finishes, and shows how long it took. Checking for a running CLIO looks at the remote agent port. If CLIO is already running there, the deployment reuses it and marks Installing CLIO and Starting CLIO as not needed. If another program holds the port, the deployment stops and says so; choose a different port in step 9. Otherwise Installing CLIO installs CLIO on the remote computer from PyPI.
-
Step 13: Start working on the remote computer
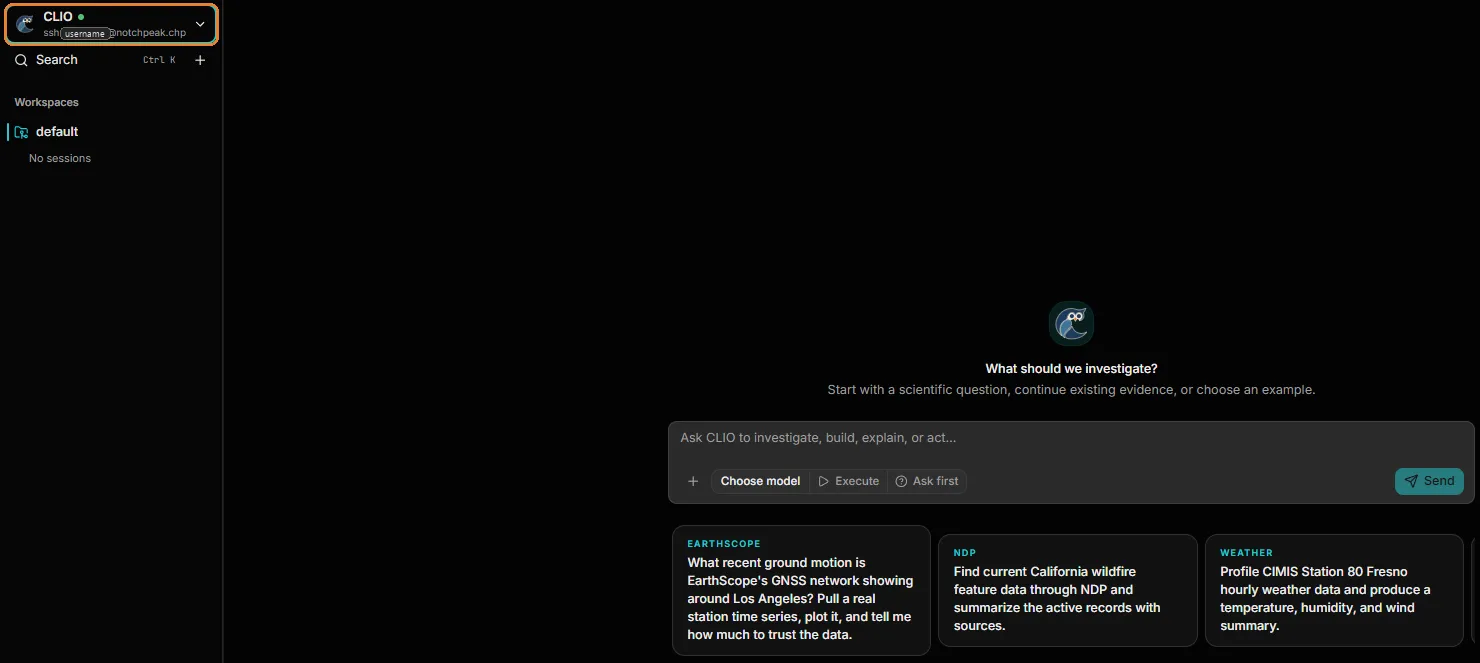
Section titled “Step 13: Start working on the remote computer”When Connecting to CLIO finishes, CLIO opens a workspace on the remote computer. The service selector at the top of the sidebar shows CLIO with a green status dot (point at it to read Ready) and the SSH route you deployed to, so you can confirm which computer you are working on.
-
Step 14: Switch between services
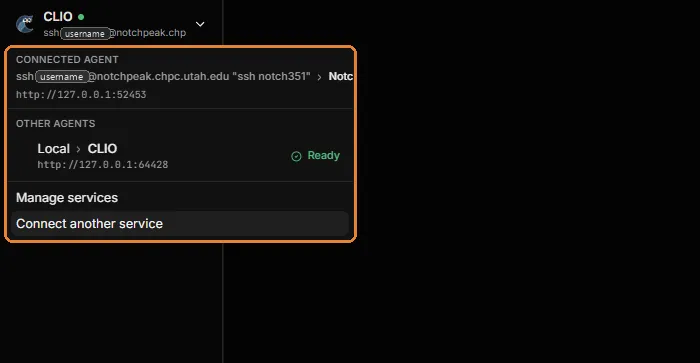
Section titled “Step 14: Switch between services”Choose the service selector to see the services you can use:
- Connected agent shows the remote deployment you are using now.
- Other agents lists your other services, such as Local on this computer, with their status.
- Manage services opens your saved services.
- Connect another service adds a new one.
-
Step 15: Reconnect from the start screen
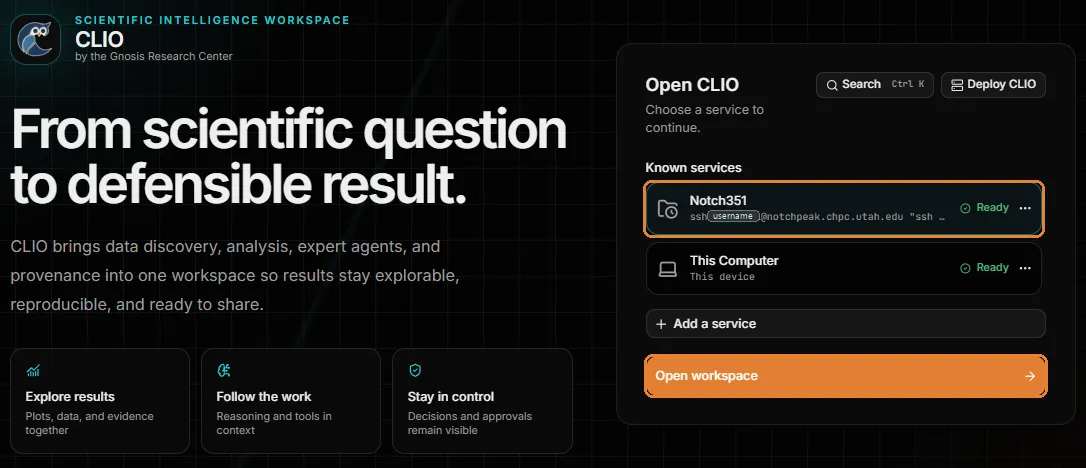
Section titled “Step 15: Reconnect from the start screen”The deployment is saved as a service. On the CLIO start screen, it appears under Known services, here as Notch351, with its status. To work on the remote computer again, choose it, then choose Open workspace.